Sectioned Toboggan With Hemmed Ribbed Brim for Men

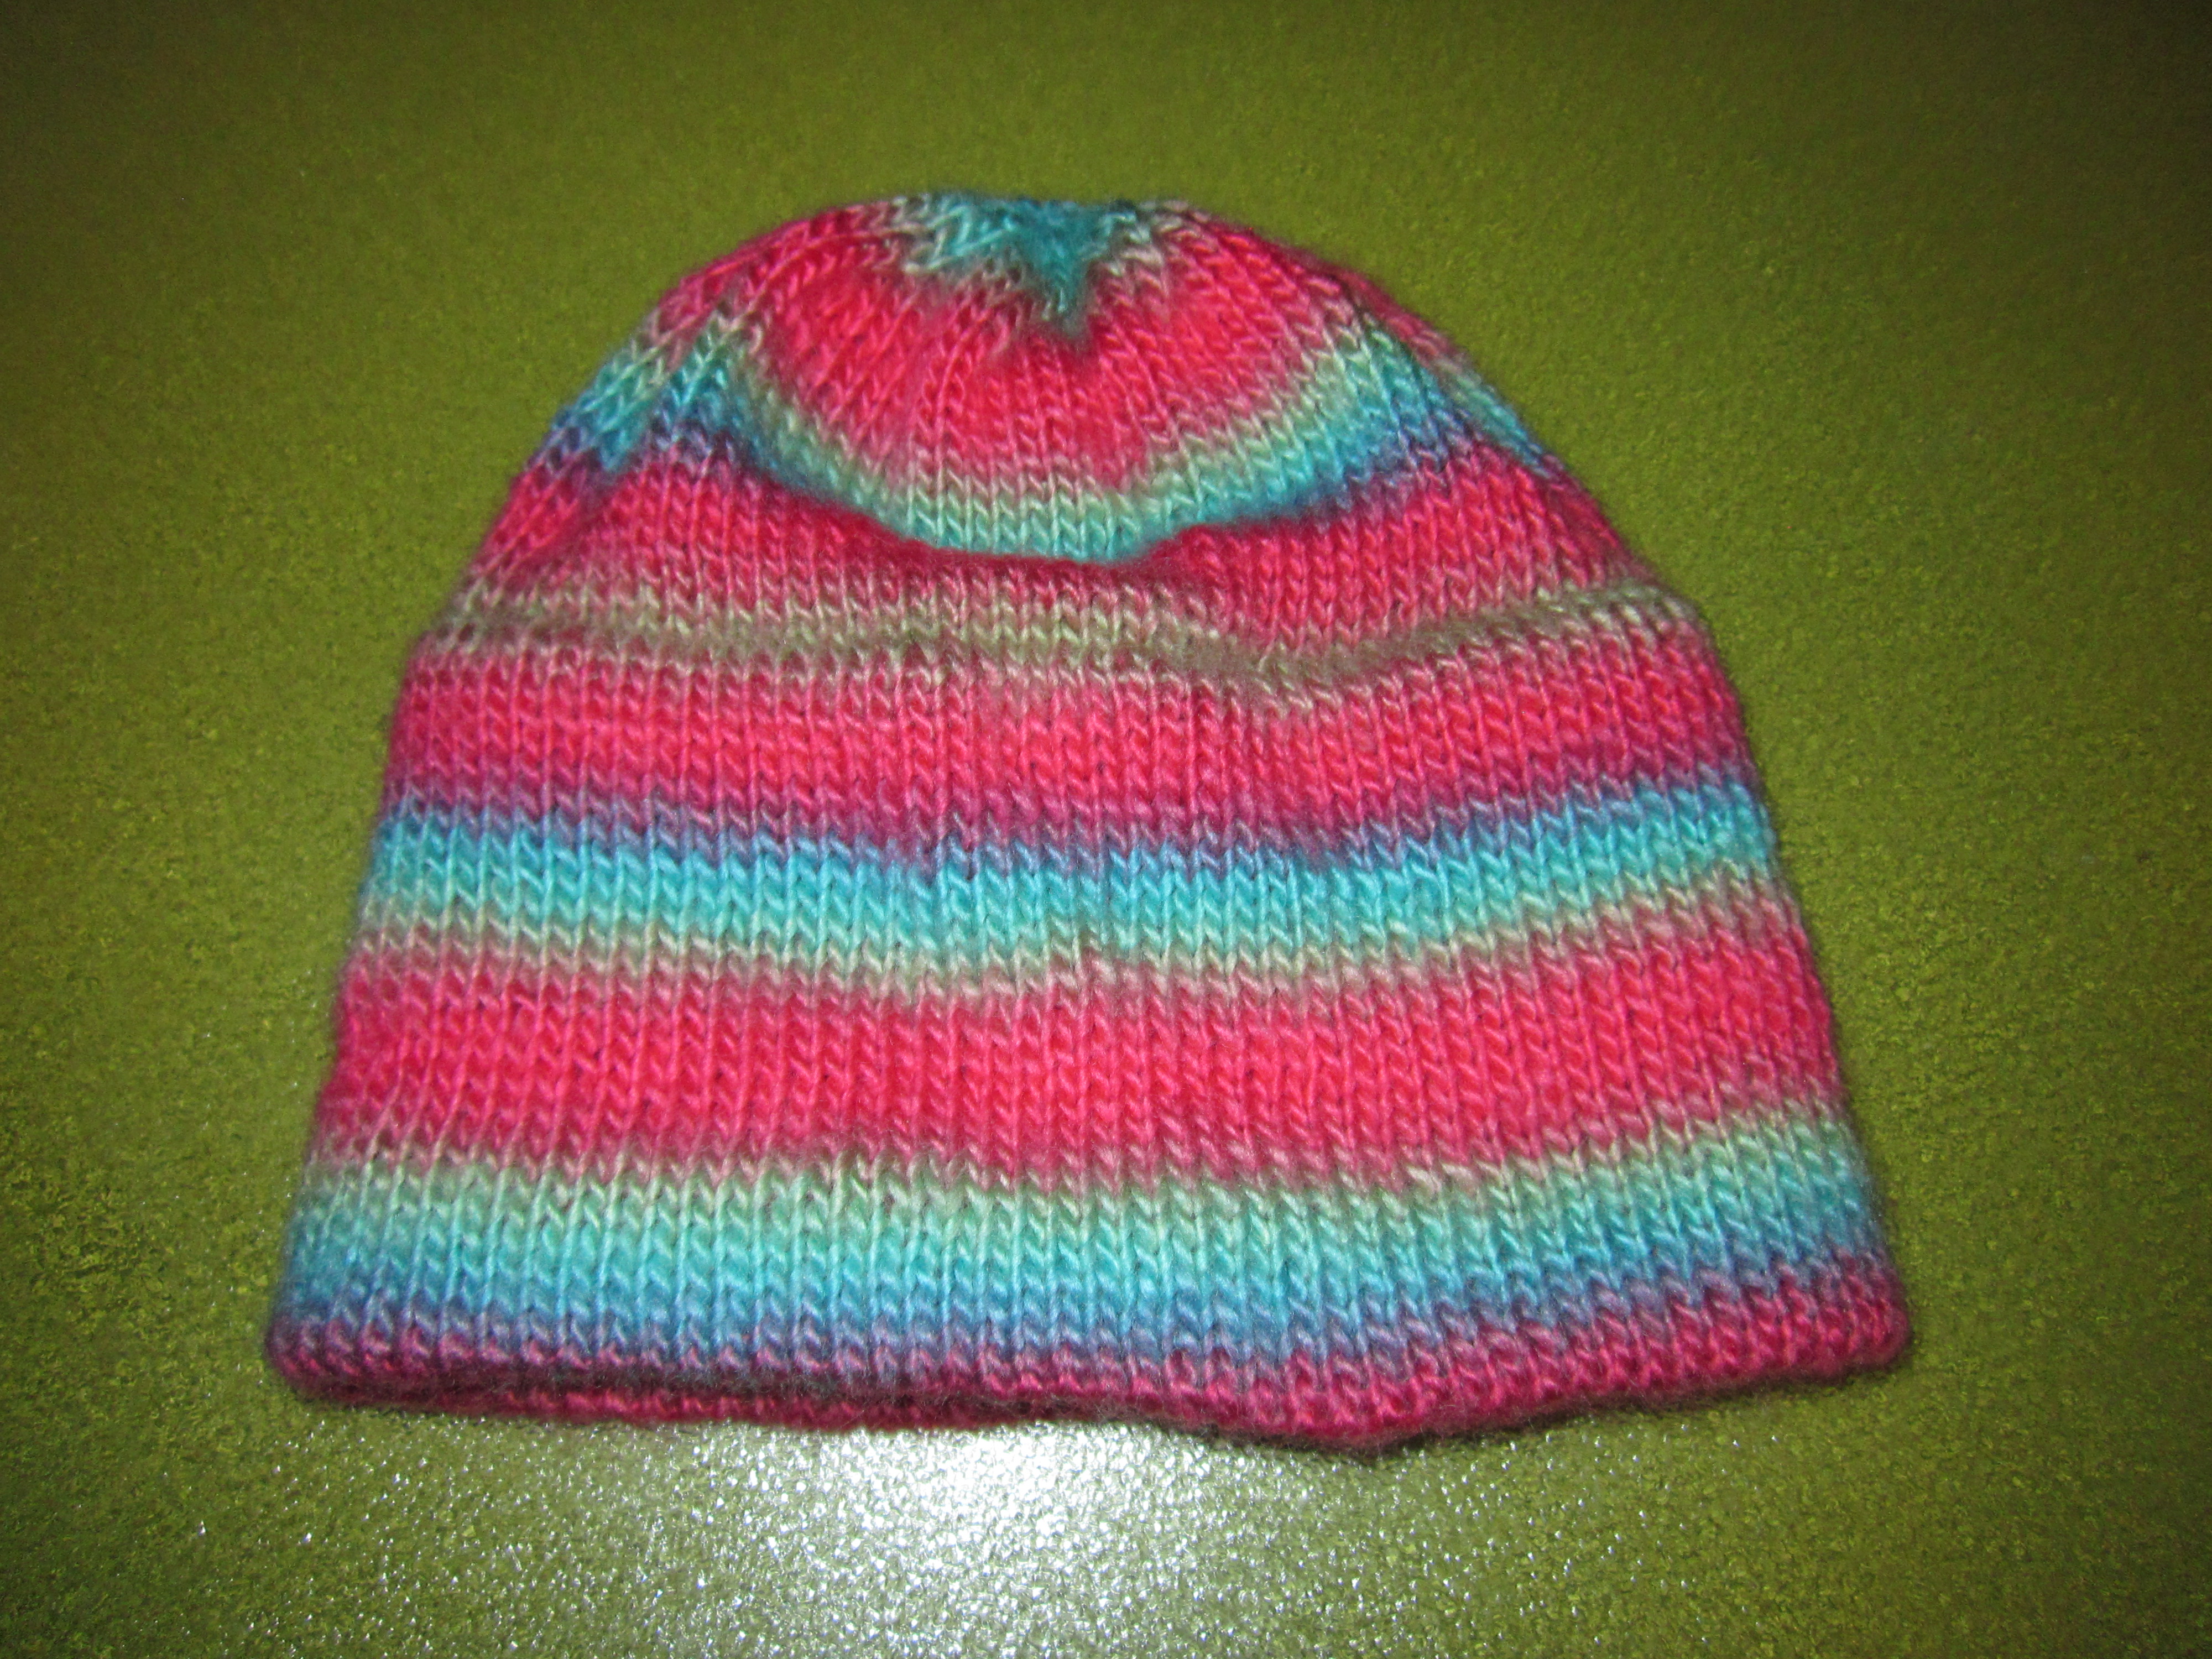
Sectioned Toboggan With Hemmed Brim for Men

This makes a large adult hat 24 inches in diameter.

Gauge: 4 stitches per inch.

Materials:
1 skein knitting worsted, color of choice
1 size US 6 (4.0 mm) circular 16-inch knitting needles.
1 set of size US 6 (4.0 mm) double pointed needles.
1 row marker
6 stitch markers that are distinctive in size or color from row marker.
Length of scrap yarn for provisional cast on.

Cast on 96 stitches using provisional cast on.
Row 1-3: Knit
Work k1, p1 ribbing until work measures 3 inches.
Knit 3 rows

Pattern stitch:
Row 1: *P3, k9, place marker, repeat from * to end of row.
Row 2: *P3, k9, repeat from * to end of row
Repeat row 2 until hat measures 6-1/4 inches. Repeat row 2 once more, removing your markers as you work the row. Hem the brim.
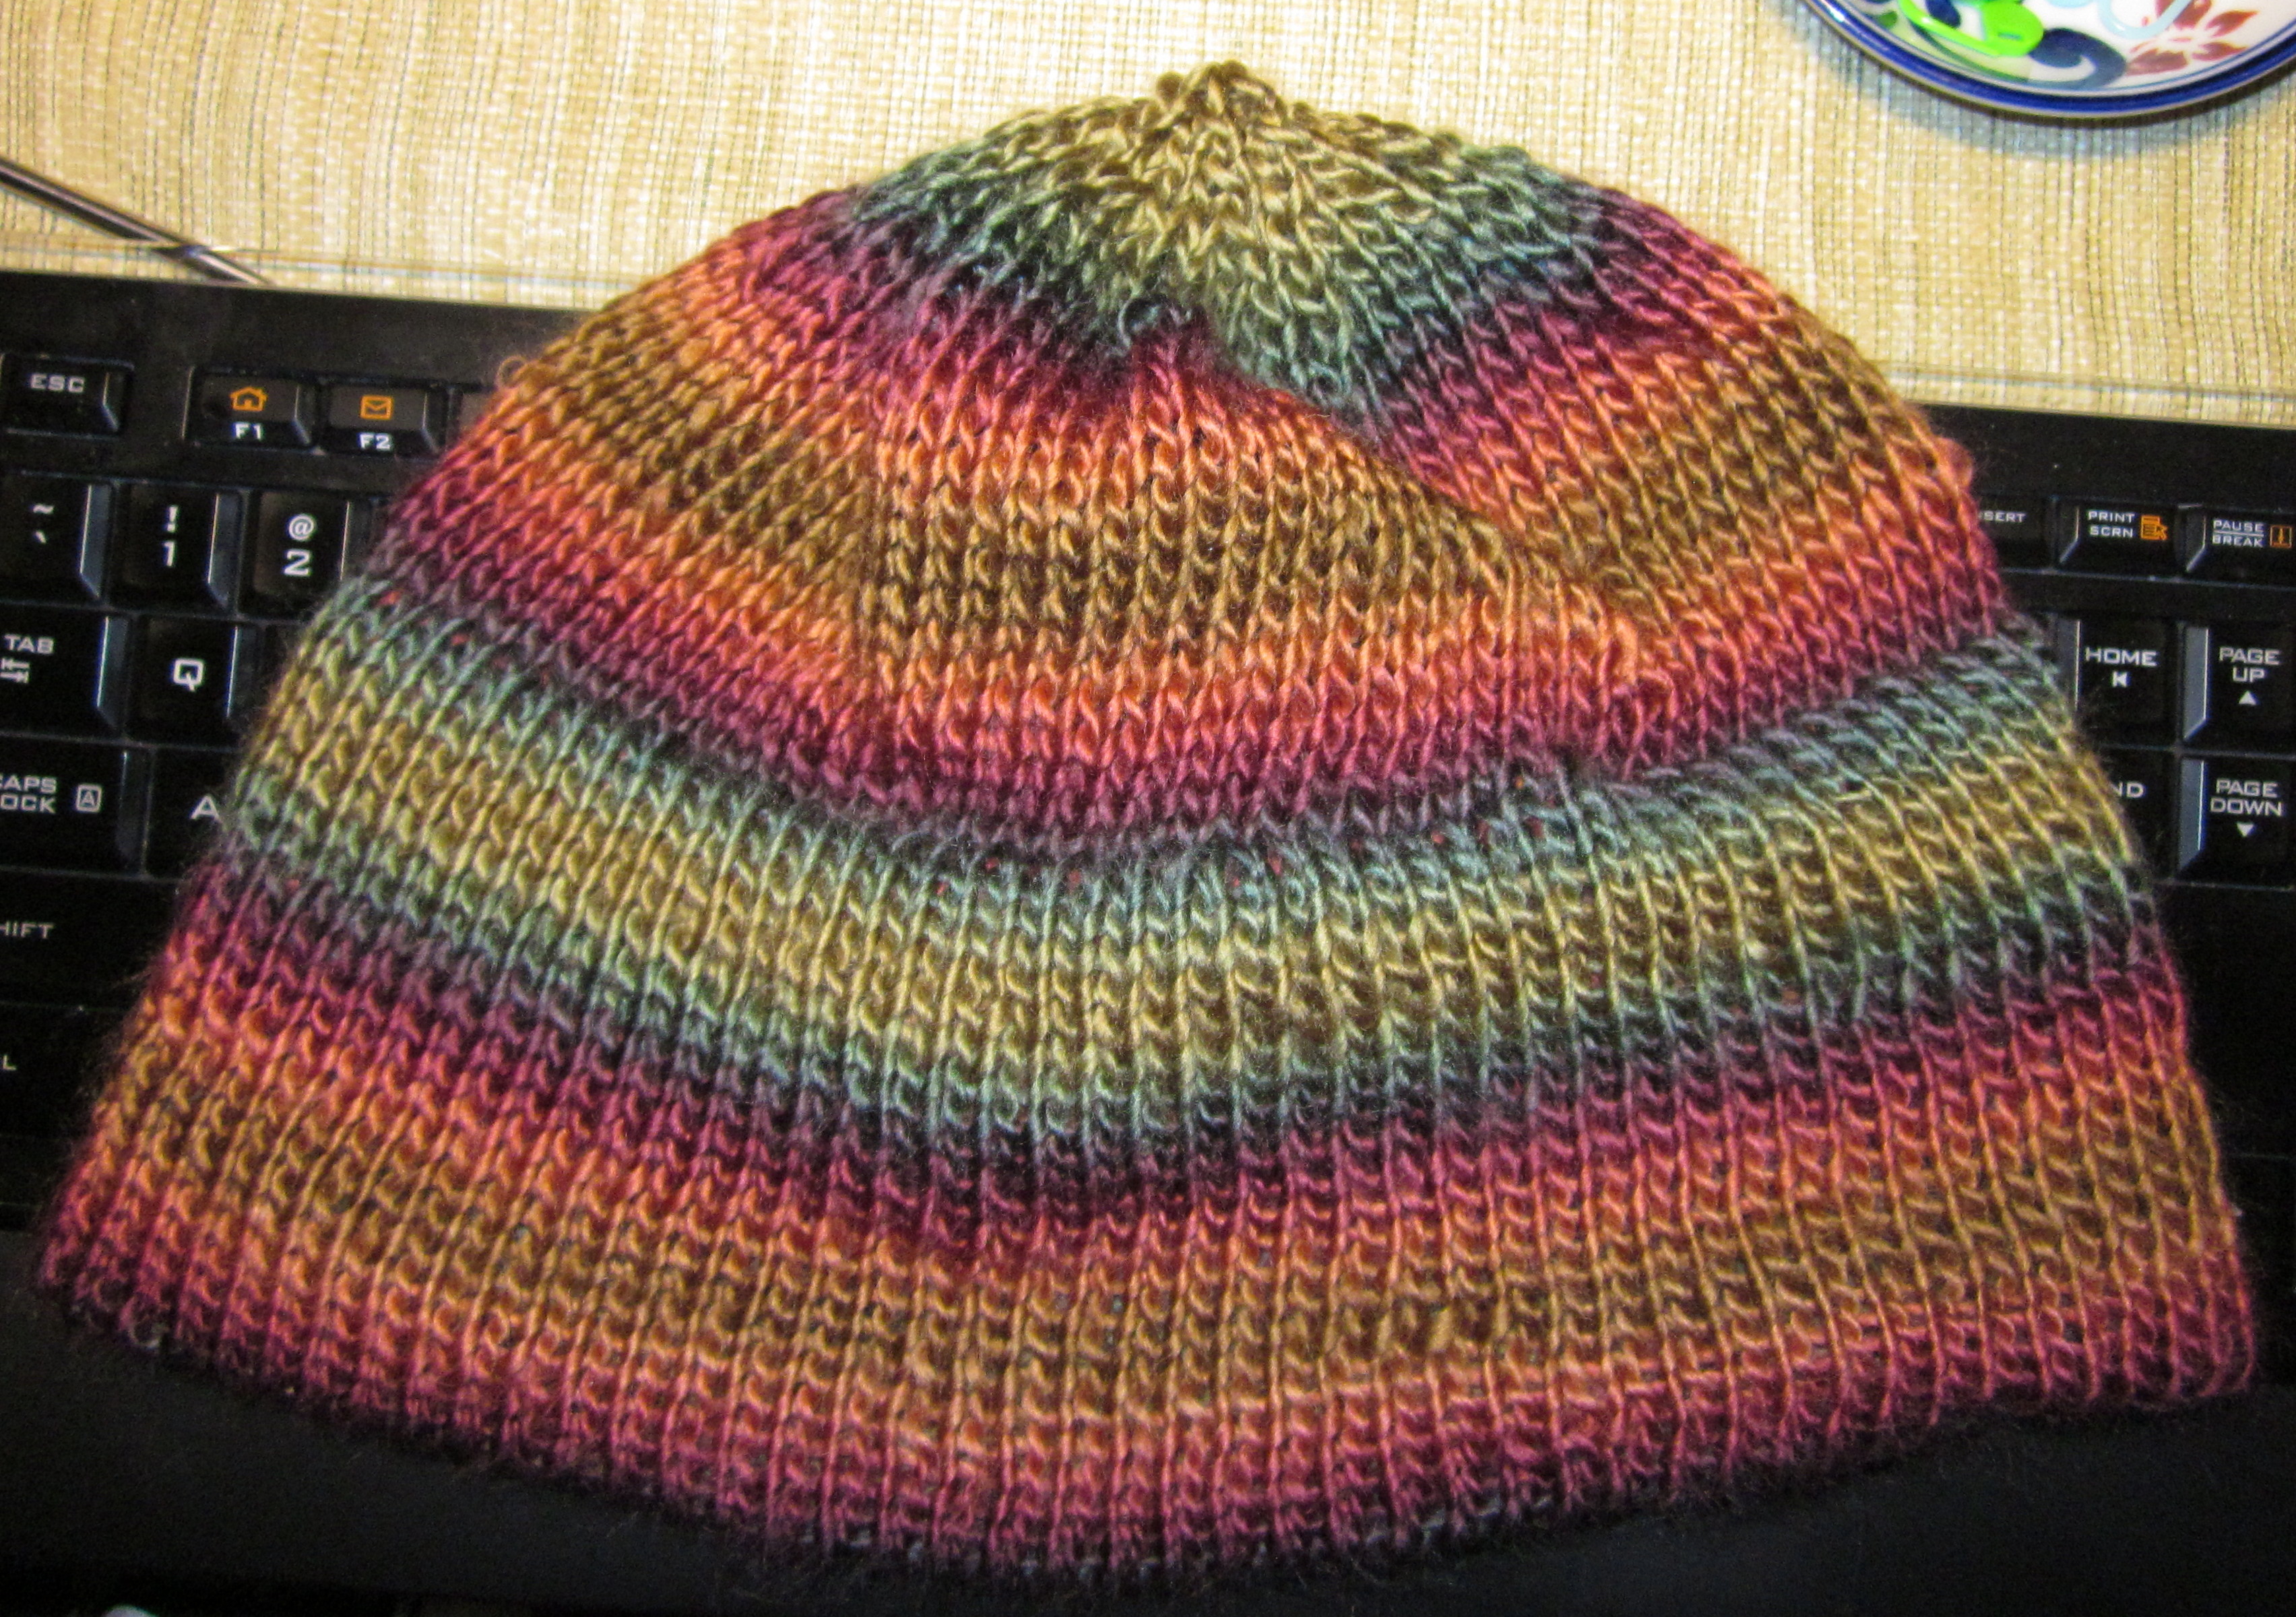
“Hemming” the Brim:
Fold the edge with the provisional cast-on under just as though you were turning a hem and bring it up through the center of the work (fold with the ribbing inside, knit side outside). Starting at the beginning of the provisional row, put the stitches from the provisional cast-on onto a second needle – either all of them onto a circular needle, or as many as will comfortably fit onto one double pointed needle, transferring more provisional stitches onto the DPN as necessary. Use your right-hand needle to transfer the first provisional stitch on that row from the provisional needle to the left-hand working needle and purl it and the first stitch on the working row together (p2tog). Transfer the second provisional stitch onto the left-hand needle and purl it and the second working stitch on the row together. Continue on around, working in pattern, until the end of the row. Make sure the beginning yarn end gets tucked down into the fold and is hidden inside the “hemmed” portion. You should come out even, with the last provisional stitch and the last working stitch being knitted together. You should end up with 96 stitches.

Begin working pattern stitch again starting with row 1. Repeat row 2 until work measures 8-1/3 inches. Work decreases.
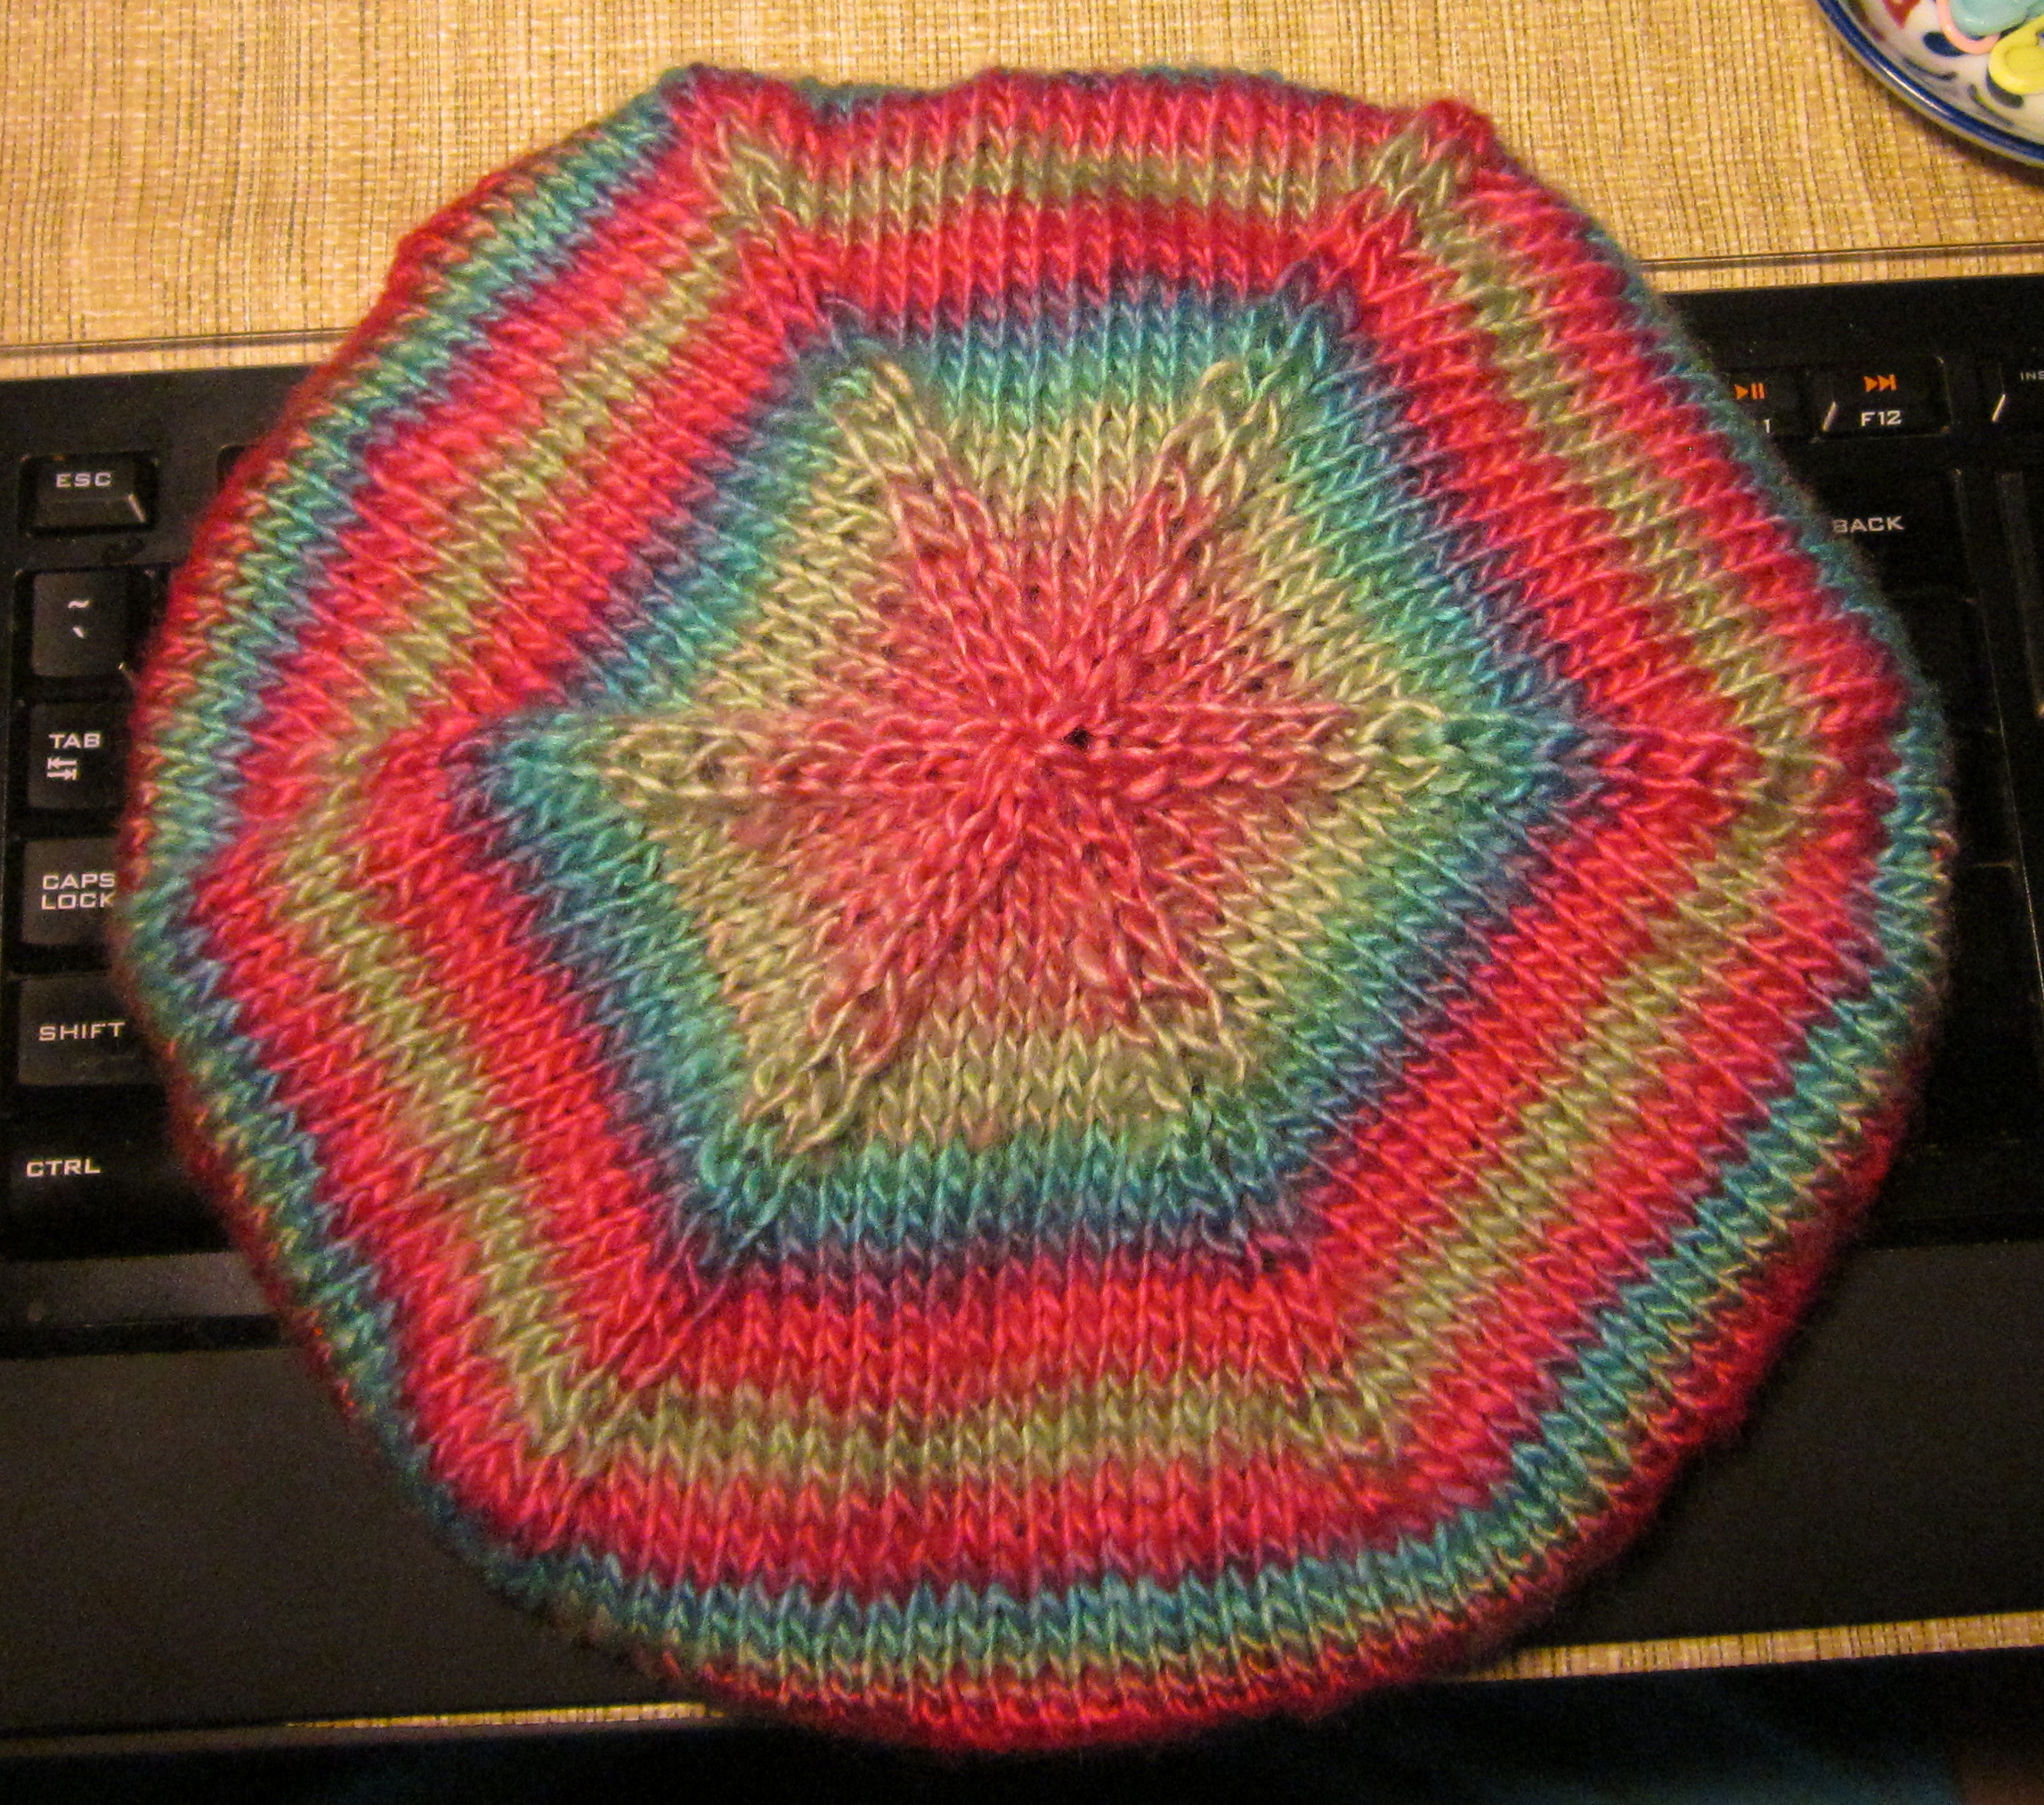
Decreases
Row 1: *P3, k4, k2tog, k3 repeat from * to end of row.
Row 2: *P3, k3, k2tog, k3, repeat from * to end of row.
Row 3: *P3, k2, k2tog, k3, repeat from * to end of row.
Row 4: *P3, k2, k2tog, k2, repeat from * to end of row.
Row 5: *P3, k1, k2tog, k2, repeat from * to end of row.
Row 6: *P1, p2tog, k4, repeat from * to end of row.
Row 7: *P2, k1, k2tog, k1, repeat from * to end of row.
Row 8: *p2tog, k1, k2tog, repeat from * to end of row.
Row 9: *k2tog, repeat from * to end of row
Cut thread, pass thread through stitches on needle, pull tight and secure.

Pink Power Hat

Pink Power Hat

Materials:
1 skein Red Heart Worsted weight (Medium:4) yarn color: Pretty ‘n Pink
Size US8 (5.0) 16-inch circular knitting needle.
Size US 0 (zero) (3.25 mm) crochet hook
81 beads with center hole large enough to get tip of crochet hook through, style/color of choice.
1 row marker.
(8 stitch markers of a different color than your row marker, if desired)

Abbreviations:
dyo = drop the yarn over from the previous row.
tbos, sl = thread bead on stitch, slip stitch. Insert the crochet hook through the center of the bead, hook the next knit stitch and pull it through the bead, then slip that stitch onto the right needle. Continue on with the pattern. Dropping the yo provides enough slack to allow the bead to be threaded over the following knit stitch and for that stitch to be knitted on the next row without the work puckering.

Note: This has a 9-stitch pattern repeat. You may wish to place a marker at 9-stitch intervals to help you keep track.

Body:
Cast on 80 stitches, join to knit in round.

Rows 1-9: *k1, p1, repeat from * to end of row.
Row 10:  kfb, p6, k1, *k2, p6, k1, repeat from * to end of row (81 stitches)
Row 11: *k3, p6, repeat from * to end of row.
Row 12: *p1, k2, yo, k1, p5, repeat from * to end of row.
Row 13: *p2, k1, dyo, tbos, sl, k1, p4, repeat from * to end of row.
Row 14: *p3, k3, p3, repeat from * to end of row.
Row 15: *p4, k2, yo, k1, p2, repeat from * to end of row.
Row 16: *p5, k1, dyo, tbos, sl, k1, p1, repeat from * to end of row.
Row 17: *p6, k3, repeat from * to end of row.
Row 18: *yo, k1, p6, k2, repeat from * to end of row.
Row 19: *dyo, tbos, sl, k1, p6, k1, repeat from * to end of row.
Repeat rows 11-19 twice more.

Decreases:
Row 1: *k3, p2, p2tog, p2, repeat from * to end of row.
Row 2: *p1, k3, p1, p2tog, p1, repeat from * to end of row.
Row 3: *p2, k3, p2tog, repeat from * to end of row.
Row 4: *p3, k1, k2tog, repeat from * to end of row.
Row 6: *k1, p2tog, p1, k1, repeat from * to end of row.
Row 5: *p2tog, k2, repeat from * to end of row.
Row 7: *k2tog, p1, repeat from * to end of row.
Row 8: *k2tog, repeat from * to end of row.
Row 9: *k2tog, repeat until 1 stitch remains, k1.
Cut yarn, and thread the tail end through the stitches, secure. Weave in ends. Enjoy.

Variation: Hat without beads
Substitute these 9 rows for the corresponding rows in the hat body above.
Row 11: *k3, p6, repeat from * to end of row.
Row 12: *p1, k3, p5, repeat from * to end of row.
Row 13: *p2, k3, p4, repeat from * to end of row.
Row 14: *p3, k3, p3, repeat from * to end of row.
Row 15: *p4, k3, p2, repeat from * to end of row.
Row 16: *p5, k3, p1, repeat from * to end of row.
Row 17: *p6, k3, repeat from * to end of row.
Row 18: *k1, p6, k2, repeat from * to end of row.
Row 19: *k2, p6, k1, repeat from * to end of row.
Work decreases as noted above.

A Little Twisted Hat

2017_10_17-04A Little Twisted Hat

Materials:
1 skein of knitting worsted
1 size US 10 (6.0 mm) 16-inch circular needles
1 set of US 10 (6.0 mm) double pointed needles.
12 stitch markers, with one distinctly different in size, color or type for a row marker.
1 cable needle.

Cast-On 80 stitches.
Join to knit in round.
Rows 1-9: *k1, p1, repeat from * to end of row.
Row 10: Kfb, k1, kfb, *k2, kfb, repeat from * to end of row. (108 stitches)
Row 11-16: *k6, p3, repeat from * to end of row
Row 17: *C6F, p3, repeat from * to end of row.
Repeat rows 11-17 two more times.
Row 18-20: *k6, p3, repeat from * to end of row.

2017_10_17-05Decreases:
Row 1: *k2, ssk, k2, p3, repeat from * to end of row.
Row 2: *k2, ssk, k1, p3, repeat from * to end of row.
Row 3: *k1, ssk, k1, p3, repeat from * to end of row.
Row 4: *k1, ssk, p3, repeat from * to end of row.
Row 5: *ssk, p3, repeat from * to end of row.
Row 6: *ssk, p2, repeat from * to end of row.
Row 7: *ssk, p1, repeat from * to end of row.
Row 8: *ssk, repeat from * to end of row.
Row 9: *ssk, repeat from * to end of row

Cut thread with enough length to thread through remaining 6 stitches on needle. Secure and weave in ends. Enjoy.

Fabled Cable Hat

Fabled Cable Hat

Materials:
1 skein Lion Brand Landscapes Medium:4, 3.5 oz/100g, 147 yd/134 m, color “Desert Spring”
US size 8 (5.0 mm) 16-inch (40.5 cm) circular needle
US size 8 (5.0 mm) double pointed needle set
Cable needle
Row marker and 8 stitch markers of a different style or color from the row marker.

Cast on: 90 stitches
Hat Band:
Rows 1-9: *k1, p1, repeat from * to end of row

Hat Body:
Row 1: *k3, kfb, k2, kfb, p3, place stitch marker, repeat from * to end of row.
Row 2-3: *k9, p3, repeat from * to end of row.
Row 4: *k9, p3, repeat from * to end of row.
Row 5: *C6F, k3, p3, repeat from * to end of row.
Row 6: *k9, p3, repeat from * to end of row.
Row 7: *k9, p3, repeat from * to end of row.
Row 8: *k9, p3, repeat from * to end of row.
Row 9: *k3, C6B, p3, repeat from * to end of row.
Row 10: *k9, p3, repeat from * to end of row.
Row 11: *k9, p3, repeat from * to end of row.
Repeat rows 4-11 three times.
Row 12: *k9, p3, repeat from * to end of row.
Leaving stitch markers in place, begin decreases.

Decreases:
Row 1: *ssk, k7, p3, repeat from * to end of row (99 stitches)
Row 2: *ssk, k6, p3, repeat from * to end of row (90 stitches
Row 3: *ssk, k5, p3, repeat from * to end of row (81 stitches)
Row 4: *ssk, k4, p3, repeat from * to end of row (72 stitches)
Row 5: *ssk, k3, p3, repeat from * to end of row (63 stitches)
Row 6: *ssk, k2, p3, repeat from * to end of row (54 stitches)
Row 7: *ssk, k1, p3, repeat from * to end of row (45 stitches)
Row 8: *ssk, p3, repeat from * to end of row (36 stitches)
Row 9: *ssk, p2, repeat from * to end of row (27 stitches)
Row 10: *ssk, p1, repeat from * to end of row (18 stitches)
Row 11: *ssk, repeat from * to end of row (9 stitches)
Row 12: *ssk, repeat from * until 1 stitch left, k1. (5 stitches)
Cut yarn, leaving enough of a tail end that it can be threaded through all the stitches on the needle, pulled tight and secured. Weave in ends. Enjoy.

Hemmed Toboggan with Internal Ribbing

Hemmed Toboggan with Internal Ribbing

This is a very simple, easy toboggan (except the hemming part is a bit tricky). The “hemming” of the bottom gives a double thickness over the ears and forehead for extra warmth. The internal ribbing helps keep it securely on the head. The things you need to know to make it: Provisional cast on, knitting in the round, how to do a knit stitch, a purl stitch, a k2tog stitch and an ssk,

Materials:
1 skein Red Heart Unforgettable, Medium:4, 3.5 oz/100 g, 270 yards/246 m, colorway: whichever one strikes your fancy.
Needle: Size US4 (3.5 mm) 16-inch circular needle, and a set of US4 (3.5 mm) double pointed needles (DPNs). (optional: a second US4 (4.5 mm) circular needle of any length if you have one)
9 Stitch markers, with one of a distinct color or type from the others to use as a row marker.

Note on Yarn Usage: You can get three hats out of two skeins of this yarn.

Body of Hat
On the 16-inch circular needle, cast on 90 stitches using provisional cast on method.
Join, place row marker. Knitting in the round, knit 3 rows (stockinette). Starting with row 4, work k1, p1 ribbing for 3 inches. Knit until piece measures 9 inches (23 cm), stopping at the end of the row.

“Hemming” the Edge:
(See illustration above) Fold the edge with the provisional cast-on under just as though you were turning a hem and bring it up through the center of the work (fold purl side inside, knit side outside). Starting at the beginning of the provisional row, put the stitches from the provisional cast-on onto a second needle – either all of them onto a circular needle, or as many as will comfortably fit onto one double pointed needle, transferring more provisional stitches onto the DPN as necessary. Use your right-hand needle to transfer the first provisional stitch on that row from the provisional needle to the left-hand working needle and knit it and the first stitch on the working row together (k2tog). Transfer the second provisional stitch onto the left-hand needle and knit it and the second working stitch on the row together. Continue on around in this fashion until the end of the row. Make sure the beginning yarn end gets tucked down into the fold and is hidden inside the “hemmed” portion. You should come out even, with the last provisional stitch and the last working stitch being knitted together. You should end up with 90 stitches.

Continue knitting for another 3 inches (7.5 cm), then work Decreases.

Decreases:
Row 1: *knit 10, place marker, repeat from * to end of row.
Row 2: *ssk, k6, k2tog, repeat from * to end of row. (72 stitches)
Row 3: Knit.
Row 4: *ssk, k4, k2tog, repeat from * to end of row. (54 stitches)
Row 5: Knit.
Row 6: *ssk, k2, k2tog, repeat from * to end of row. (36 stitches)
Row 7: Knit.
Row 8: *ssk, k2tog, repeat from * to end of row. (18 stitches)
Row 9: Knit.
Row 10: *ssk, repeat from * to end of row. (9 stitches)
Row 11: *ssk, repeat from * until 1 stitch remains, k1. (5 stitches)

Cut yarn leaving a tail long enough to thread through the stitches, and fasten. Weave in the end.

Simple Pleasures Hat With Ribbed Hemmed Brim

Simple Pleasures Hat with Ribbed Hemmed Brim

Materials
Worsted weight (Medium:4) yarn, about 135 yds/123 m
(shown is 1 skein Red Heart Unforgettable, Medium:4, 3.5 oz/100 g, 270 yards/246 m, colorway: Parrot)
US 7 (4.5 mm) 16-inch circular needle.
US 7 (4.5 mm) double pointed needle set.
Row marker.
8 stitch markers of a different style or color from the row marker.

Cast On: 72 stitches using provisional cast on.
Row 1-8: *k1, p1, repeat from * to end of row.
Row 9: purl
Row 10-18: *p1, k1, repeat from * to end of row.
Row 19: pick up stitches from provisional cast on onto a double pointed needle. Transfer the first stitch of the provisional cast on to the working needle and knit it and the first stitch on the working needle together (k2tog). Transfer the next stitch from the provisional cast on to the working needle and purl it and the next stitch on the working needle together (p2tog). Repeat this process until all the working stitches and provisional cast on stitches have been knitted or purled together.
Row 20: *k3, kfb, repeat from * to end of row (90 stitches)
Row 21: *k9, kf b, repeat from * to end of row (99 stitches)
Row 22:  Knit.
Continue knitting in the round until piece measures 8 inches from top to bottom, then work decreases.

Decreases:
Row 1: *k11, place marker, repeat from * to end of row.
Row 2: *ssk, k9, repeat from * to end of row (90 stitches).
Row 3: *ssk, k8, repeat from * to end of row (81 stitches).
Row 4: *ssk, k7, repeat from * to end of row (72 stitches).
Row 5: *ssk, k6, repeat from * to end of row (63 stitches).
Row 6: *ssk, k5, repeat from * to end of row (54 stitches).
Row 7: *ssk, k4, repeat from * to end of row (45 stitches).
Row 8: *ssk, k3, repeat from * to end of row (36 stitches).
Row 9: *ssk, k2, repeat from * to end of row (27 stitches).
Row 10: *ssk, k1, repeat from * to end of row (18 stitches).
Row 11: *ssk, repeat from * to end of row (9 stitches).
Row 12: ssk x 4, k1. (5 stitches).
Cut yarn leaving a tail long enough to pull through all the stitches on the needle, draw them tight and fasten them off. Weave in yarn end. Enjoy.

No-Frills Toboggan Cap, Mark II

No Frills Toboggan Cap, Mark II

This is a very simple, easy toboggan that is all stockinette (the hemming part is a bit tricky). It is a variation of the previous pattern, the differences being a deeper “hem” and the top decreases are done over a fewer number of rows.  The “hemming” of the bottom gives a double thickness over the ears and forehead for extra warmth. The things you need to know to make it: Provisional cast on, knitting in the round, how to do a knit stitch, a k2tog and an ssk,

Materials:
1 skein Red Heart Unforgettable, Medium:4, 3.5 oz/100 g, 270 yards/246 m, colorway: whichever one strikes your fancy.
Needle: Size US4 (3.5 mm) 16-inch circular needle, and a set of US4 (3.5 mm) double pointed needles (DPNs). (optional: a second US4 (4.5 mm) circular needle of any length if you have one)
9 Stitch markers, with one of a distinct color or type from the others to use as a row marker.

Note on Yarn Usage: You can get three hats out of two skeins of this yarn.

Body of Hat
On the 16-inch circular needle, cast on 90 stitches using provisional cast on method.
Join, place row marker, and knit in the round for 9 inches (23 cm), stopping at the end of the row.

“Hemming” the Edge:
(See illustration above) Fold the edge with the provisional cast-on under just as though you were turning a hem and bring it up through the center of the work (fold purl side inside, knit side outside). Starting at the beginning of the provisional row, put the stitches from the provisional cast-on onto a second needle – either all of them onto a circular needle, or as many as will comfortably fit onto one double pointed needle, transferring more provisional stitches onto the DPN as necessary. Use your right-hand needle to transfer the first provisional stitch on that row from the provisional needle to the left-hand working needle and knit it and the first stitch on the working row together (k2tog). Transfer the second provisional stitch onto the left-hand needle and knit it and the second working stitch on the row together. Continue on around in this fashion until the end of the row. Make sure the beginning yarn end gets tucked down into the fold and is hidden inside the folded portion. You should come out even, with the last provisional stitch and the last working stitch being knitted together. You should end up with 90 stitches.

Continue knitting for another 3 inches (7.5 cm), then work Decreases.

Decreases:
Row 1: *knit 10, place marker, repeat from * to end of row.
Row 2: *ssk, k6, k2tog, repeat from * to end of row. (72 stitches)
Row 3: Knit.
Row 4: *ssk, k4, k2tog, repeat from * to end of row. (54 stitches)
Row 5: Knit.
Row 6: *ssk, k2, k2tog, repeat from * to end of row. (36 stitches)
Row 7: Knit.
Row 8: *ssk, k2tog, repeat from * to end of row. (18 stitches)
Row 9: Knit.
Row 10: *ssk, repeat from * to end of row. (9 stitches)
Row 11: *ssk, repeat from * until 1 stitch remains, k1. (5 stitches)

Cut yarn leaving a tail long enough to thread through the stitches, and fasten. Weave in the end.

Original No Frills Toboggan Cap

Original No Frills Toboggan Cap

This is a very simple, easy toboggan cap that is worked all in stockinette (except the hemming part is a bit tricky). The “hemming” of the bottom gives a double thickness over the ears and forehead for extra warmth, without the need to fold up the bottom of the cap. The things you need to know to make it: How to do a provisional cast on, how to knit in the round, how to do a knit stitch, a k2tog and an ssk.  TV knitting at its finest.

Materials:
1 skein Red Heart Unforgettable, Medium:4, 3.5 oz/100 g, 270 yards/246 m, colorway: whichever one strikes your fancy.  (or any DK weight yarn.)  You can easily get 3 hats out of 2 skeins.
Needle: Size US4 (3.5 mm) 16-inch circular needle, and a set of US4 (3.5 mm) double pointed needles (DPNs). (optional: a second US4 (3.5 mm) circular needle of any length if you have one)
9 Stitch markers, with one of a distinct color or type from the others to use as a row marker.

Body of Hat:
On the 16-inch circular needle, cast on 90 stitches using provisional cast on method.
Join, place row marker, and knit in the round for 8-1/4 inches (21 cm), stopping at the end of the row.

Hemming the Bottom:
(See illustration at left) Fold the edge with the provisional cast-on under just as though you were turning a hem and bring it up through the center of the work (fold purl side inside, knit side outside). Starting at the beginning of the provisional row, put the stitches from the provisional cast-on onto a second needle – either all of them onto a circular needle, or as many as will comfortably fit onto one double pointed needle, transferring more provisional stitches onto the DPN as necessary. Use your right-hand needle to transfer the first provisional stitch on that row purlwise from the provisional needle to the left-hand working needle, being careful to keep the stitch in the same orientation.  Knit it and the first stitch on the working row together (k2tog). Be sure when you are knitting the two stitches together that the provisional stitch is on the right and the working stitch is on the left, so that when the k2tog is worked, the provisional stitch will end up on the wrong side of your work.  Transfer the second provisional stitch onto the left-hand needle and knit it and the second working stitch on the row together. Continue on around in this fashion until the end of the row. Make sure the beginning yarn end gets tucked down into the fold and is hidden inside the folded portion. You should come out even, with the last provisional stitch and the last working stitch being knitted together. You should end up with 90 stitches.

Continue knitting for another 3 inches (7.5 cm), then work Decreases.

Decreases:
Row 1: *knit 10, place marker, repeat from * to end of row.
Row 2: *ssk, k8, repeat from * to end of row. (81 stitches)
Row 3: knit
Row 4: *ssk, k7, repeat from * to end of row. (72 stitches)
Row 5: knit.
Row 6: *ssk, k6, repeat from * to end of row. (63 stitches)
Row 7: knit.
Row 8: *ssk, k5, repeat from * to end of row. (54 stitches)
Row 9: knit.
Row 10: *ssk, k4, repeat from * to end of row. (45 stitches)
Row 11: knit.
Row 12: *ssk, k3, repeat from * to end of row. (36 stitches)
Row 13: knit.
Row 14: *ssk, k2, repeat from * to end of row. (27 stitches)
Row 15: knit.
Row 16: *ssk, k1, repeat from * to end of row. (18 stitches)
Row 17: knit.
Row 18: *ssk, repeat from * to end of row. (9 stitches)
Row 19: knit.
Cut yarn leaving a tail long enough to thread through all the stitches, and fasten. Weave in the end.

Beret with Cable Accents

Beret with Cable Accents

Modified from a pattern by Andi Satterlund

Materials
Yarn: 1 Skein of Red Heart Boutique Unforgettable, Medium:4, 3.5 oz/100 g, 280 yds/256 m, color “Parrot” or any Aran or worsted weight yarn. (Depending on how tight you knit, you might can get two hats from a skein of this yarn.)
Needles: 16-inch US 8 (5.0 mm) circular needles and US 8(5.0 mm) double pointed needles.
Stitch markers.

Gage: 9 stitches and 12 rows = 2 inches.

Cast on 96
Rows 1-9: *K2, p2; repeat from * to end.
Row 10: Knit.
Row 11: *C6B, k2; repeat from * to end.
Row 12: Knit.
Row 13: *K2, kfb, k2, kfb, k1, kfb, repeat from * to end. (132 stitches)
Row 14-15: Knit.
Row 16: *C6B, K5, repeat from * to end.
Row 17: Knit.
Row 18: K7, *kfb, k10; rep from * until 3 stitches left, kfb, k3. (144 stitches).
Row 19: Knit
Row 20: *C6B, k6 , repeat from * to end of row.
Row 21-34: Knit to end.
Row 35: (K24, place a marker) 5 times, k24.
Row 36: *Ssk, knit to two stitches before marker, k2tog; repeat from * to end.
Row 37: Knit to end.
Repeat rows 36-37 until 12 stitches remain.  Change to DPN needles when necessary.
Last row: K2tog to end. 6 stitches remain
Cut your yarn leaving a six inch tail, and use the yarn needles to weave it through the live stitches on your needles.


Ukrainian Nako Beret

Ukrainian Nako Beret

Translated from a Ukrainian pattern and pictures I found on the internet.

This pattern assumes you know how to do a provisional cast on, grafting, and a crocheted join.  See pictures at the end of the post.

Materials:
Worsted weight yarn
US6 (4.0 mm) or US7 (4.5 mm) 16-inch circular needle
A cable needle

(Provisional) cast on 16
First Triangle Only
Row 1: p3, k8 (cable), p3, k1, yo, k1
Row 2: and all wrong side rows, purl the purls and knit the knits according to the pattern, except as noted.
Row 3: p3, k8, p3, k1, yo, k2
Row 5: p3, C8F, p3, k1, yo, k3
Row 7: p3, k8, p3, k1, yo, k4
Row 9: p3, k8, p3, k1, yo, k5
Row 11: p3, k8, p3, k1, yo, k6
Row 13: p3, k8, p3, k1, yo, k7
Row 15: p3, k8, p3, k1, yo, k8
Row 17: p3, k8, p3, k1, yo, k9
Row 19: p3, C8F, p3, k1, yo, k10
Row 21: p3, k8, p3, k1, yo, k11
Row 23: p3, C8F, p3, k1, yo, k12
Row 25: p3, k8, p3, k1, yo, k14
Row 26: purl the purl stitches and knit the knit stitches in pattern.

All Subsequent Triangles
Begin the triangle decrease as follows. Make note to work C8F instead of K8 on the 12th row after the previous cable cross:
Row 1: p3, k8, p3, k1, yo, ssk, turn work and work wrong side row in pattern.
Row 2: and all wrong side rows except as noted, purl the purls and knit the knits
Row 3: p3, k8, p3, k1, yo, k1, ssk, turn work and work wrong side row in pattern.
Row 5: p3, k8, p3, k1, yo, k2, ssk, turn work and work wrong side row in pattern.
Row 7: p3, k8, p3, k1, yo, k3, ssk, turn work and work wrong side row in pattern.
Row 9: p3, k8, p3, k1, yo, k4, ssk, turn work and work wrong side row in pattern.
Row 11: p3, k8, p3, k1, yo, k5, ssk, turn work and work wrong side row in pattern.
Row 13: p3, k8, p3, k1, yo, k6, ssk, turn work and work wrong side row in pattern.
Row 15: p3, k8, p3, k1, yo, k7, ssk, turn work and work wrong side row in pattern.
Row 17: p3, k8, p3, k1, yo, k8, ssk, turn work and work wrong side row in pattern.
Row 19: p3, k8, p3, k1, yo, k9, ssk, turn work and work wrong side row in pattern.
Row 21: p3, k8, p3, k1, yo, k10, ssk, turn work and work wrong side row in pattern.
Row 23: p3, k8, p3, k1, yo, k11, ssk, turn work and work wrong side row in pattern.
Row 25: p3, k8, p3, k1, yo, k12, ssk, turn work and work wrong side row in pattern.
Row 27: p3, k8, p3, k1, yo, k13, ssk, turn work and work wrong side row in pattern.

Repeat rows 1-27 above until all six triangles have been worked.

Graft the ends of the cable band and use a crochet hook to join the edges of the first and sixth triangles. Picking up stitches around the right edge of the cable and working in the round, work 12 rows of k1, p1 ribbing and bind off.

*******
I found these pictures on the interwebs which I image searched and found the below pattern for. The above is my best shot at a translation.  The original pattern is from here:

набрать 16 петель
1 ряд: 3 изн,8 лиц(косичка),3 изн,1 лиц,1 накид,1 лиц
2 ряд и все изнаночные по рисунку
3 ряд: 3 изн,8 лиц,3 изн,1 лиц, накид,2 лиц
5 ряд: 3 изн,8 лиц,3 изн,1 лиц, накид,3 лиц
7 ряд: 3 изн,8 лиц,3 изн,1 лиц, накид,4 лиц
9 ряд: 3 изн,8 лиц,3 изн,1 лиц, накид,5 лиц
11 ряд: 3 изн,8 лиц,3 изн,1 лиц, накид,6 лиц
12 ряд: 3 изн,8 лиц. скрестить 4х4,3 изн,1 лиц, накид,7 лиц.
скрещивание косички каждые 12 рядов. Когда треугольничек будет из 14 петель начинаем убавления и 2 треугольничек, в каждом лицевом ряду убавляем по 1 петли. примерно так:… накид,2 вместе и поворачиваем вязание, остальные петли остаются на спице, этим образом первый треугольничек убавляется, второй прибавляется.
Берет состоит из 6 треугольничков.
после набрать из кромки косички петли и связать резинку. Выполнить шов соединения.