Sharing Knitting Patterns I've Written and Modified
Author: WOL
My burrow, "La Maison du Hibou Sous Terre" is located on the flatlands of West Texas where I live with my computer, my books, and a lot of yarn waiting to become something.
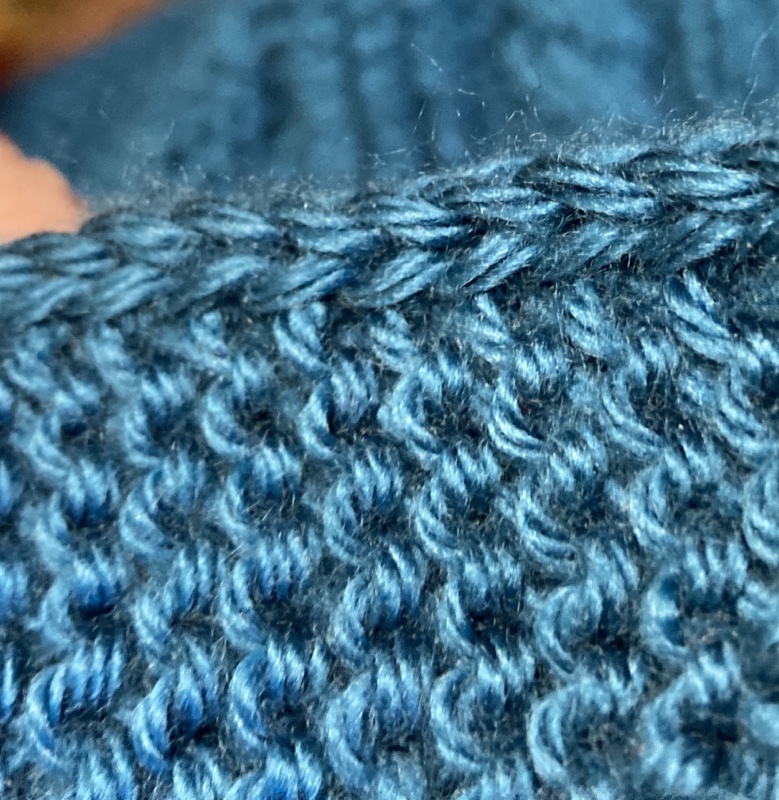
For those who are interested, a further word about the (sl1 wyif, k1) edging. (If anybody knows what this stitch is called, please let me know!) If you are adding it to an existing pattern, you will need to cast on four more stitches than the pattern calls for, as the edging is worked over the first two and last two stitches of each row row. Here is an example of the edging on garter stitch: Front of work, edge, and back of work.
Abbreviations:
Sl1 - slip one stitch purlwise from the left to the right needle without working it.
wyif - with yarn in front of the work as if to purl.
At the beginning of the row, keep the working yarn on the purl side (front) of the work, slip the first stitch purlwise, then move your yarn to the knit side (back of the work) and knit the next stitch. Proceed with the row as written in the pattern until two stitches remain.
With two stitches remaining, move the working yarn to the front of the work, slip one stitch purlwise, move the yarn to the back of the work, and knit the last stitch. (You are, in essence, wrapping the working yarn around the front of the slipped stitch.)
I suspect this stitch might be a narrow version of an I-cord edging. That’s the edging I used on both edges of this shawl.
Version A in Red Heart’s Unforgettable yarn, colorway Dragonfly
Savannah Squares Scarf Shawl
This is a knit-in-the-round scarf/shawl intended to be worn folded in half diagonally. It can be worn either draped bib style around the neck, or draped around the shoulders in shawl fashion. It can be embellished (as here) with small tassels attached to each corner. It can be knit in any size yarn using any size needles depending on the weight/loft of fabric you want and how you intend to wear it. (A great stash buster project!) This pattern would also make a great baby afghan.
Materials:
Yarn:
Version A: 5 skeins of Red Heart Boutique Unforgettable, Medium (4), 3.5 oz/100g, 270 yds/246 m, color Dragonfly.
Version B: 3 skeins of Malabrigo Sock, Light Fingering (1), 3.53 oz/100 g, 440 yds/402 mm color, Whale’s Road.
Needles: Version A: double pointed needles (DPN) size US 8 (5.0 mm), and circular needles in size US 8 (5.0 mm) of 16 inches, 24 inches, 36 inches and 47 inches in length.
Version B: double pointed needles (DPN) size US 3 (3.25 mm), and circular needles in size US 3 (3.25 mm) of 16 inches, 24 inches, 36 inches and 47 inches in length.
Notions: 4 stitch markers, making sure one is obviously different from the others either in type or color to serve as row marker.
Setup:
Cast on 8 stitches onto a single DPN using long tail cast on method. You will work these stitches off two at a time onto the remaining DPNs until all four DPNs have been brought into play.
Row 1: Kfb, kfb; on the next needle, kfb, kfb; on the next needle, kfb, kfb; on the next needle, kfb, kfb. You should now have four DPNs in play with 4 stitches on each needle (16 sts total). Attach a row marker to the work. Join work to knit in round, being careful not to twist any stitches.
Row 2: Knit in round, *k1, p1, repeat from * to end of row. (16 sts, 4 per DPN)
Row 3: *Kfb, k2, kfb, repeat from * to end of row. (24 sts, 6 per DPN)
Row 4: *k1, p1, repeat from * to end of row. (24 sts, 6 per DPN)
NOTE: Increases are worked on the odd numbered (knit) row; your total number of stitches will increase by 8 stitches at the end of each odd number (knit) row. (6 sts per needle = 24, 8 sts per needle = 32, 10 sts per needle = 40, 12 sts per needle = 48, etc.)
Row 5: *(kfb, k until 1 st remains on needle, kfb), repeat from * x 3 .
Row 6: *k1, p1) repeat from * to end of row
Repeat rows 5 and 6 until the double pointed needles become overcrowded with stitches. Knit off onto the 16-inch circular needle. Each time you knit all the stitches off a DPN, place a marker, placing the row marker after you’ve knitted all the stitches off the fourth DPN. (Again, make sure your row marker is obviously different in either type or color from the other three markers.)
Row 7: *(kfb, k until 1 stitch before marker, kfb), repeat from * to end of row.
Row 8: *(k1, p1), repeat from * to end of row.
Repeat rows 7 and 8 until the scarf measures at least 26 inches from the center point to the tip of a corner. This gives a square with a 52 inch diagonal.
You can end the piece by working a simple bind off, or adding one of the following knitted-on edgings, either in the same yarn or a contrasting color of yarn.
Version B in Malabrigo Sock, colorway Whale’s Road
Edging:
Note: In both versions of the edging, the k2tog is always worked using 1 stitch from the body of the scarf and 1 stitch of the edging.
Narrow Edging:
At the end of a row (doesn’t matter which), cast on 3 stitches using the E-loop method.
1. Sl1 wyif, k1, k2tog, turn work.
2. k2tog, sl1 wyif k1, turn work.
Repeat rows 1 and 2 until there are no more stitches left. Bind off and sew edging together.
Wider Edging:
At the end of an even numbered (k1, p1) row, make 6 stitches using the e-loop cast on. Turn work.
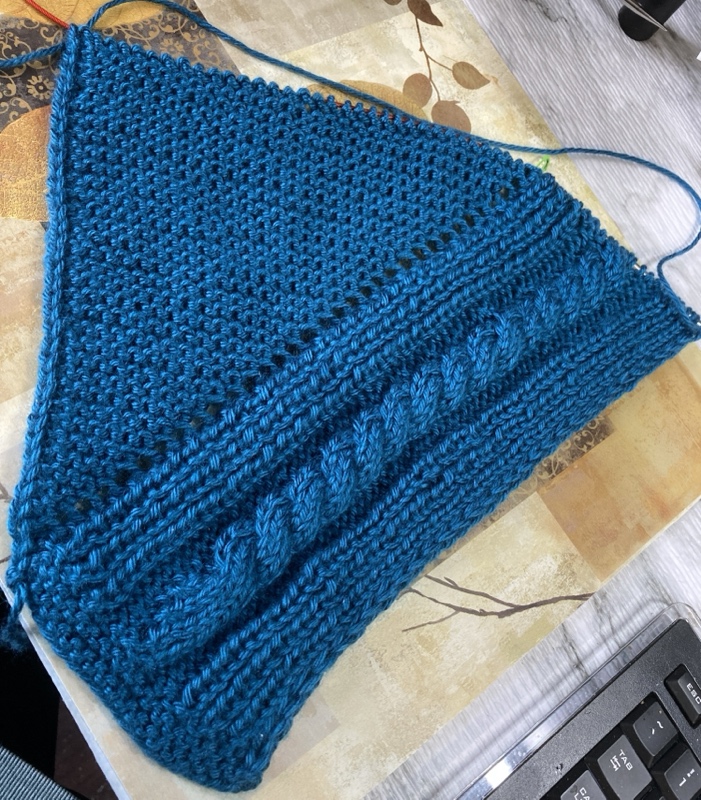
This asymmetrical shawl is one of a series of shawls inspired by the Foreigner series of books by C. J. Cherryh. This shawl was inspired by one of Cajeiri’s Human friends, Irene, or Rene-ji. The shawl is worked asymmetrically with a knit-as-you-go border on each edge. The narrower edging become the “hypotenuse” or top border of the shawl. The wider edging resembles a crochetted edging of double crochet which is continued on around the remaining side of the triangle as a knitted on edging.
The pattern is simple and easily memorized.
Materials:
3 skeins Malabrigo sock yarn, 440 yds/402 m, 3.5 oz/100 g, color Teal Feather
US6 (4.0 mm) 40-inch circular needle

Cast on 3 stitches
Row 1:	k.
Row 2:	(kfb x3).
Row 3:	k.
Row 4:	(kfb x3), k to end of row.

Row 5:	k until 6 stitches remain, kfb, yo, k2tog, p1, ssk.
Row 6:	k until 6 stitches remain, (kfb x3), p1, ssk.

Repeat rows 5 and 6 until you have about 8 oz of yarn left, ending on a row 6 repeat.  Turn work and knit until 7 stitches remain. Begin Edging by working Row 1 of Edging pattern over these 7 stitches.

Note:  When working the Edging, you may find it easier to manage the constant turning of the work if you substitute a US6 (4.0 mm) DPN for the right needle on your circular needles. If you do this, be sure to stopper the end of the circular needle that is not being used so stitches don't slide off the needle!
Edging:
Row 1:	K2togfb, yo, k2tog, p1, ssk, turn work.
Row 2:	K6, sl1p wyif, turn work.
Repeat rows 1 and 2 until no more stitches remain on your left needle at the end of row 2.
Row 3:	*k2tog, slip stitch back to left needle, repeat from * until all remaining stitches have been worked, Break yarn and pull it through the last stitch to secure it.  Weave in ends.
Side edging knited as you go
What will become the top edging
The point of the triangle
Abbreviations:
DPN - double pointed needle.
kfb – knit front and back.
ssk – slip 2 stitches knitwise, reinsert the left needle into the stitches and knit them together through the back loop.
k2tog – knit two stitches together.
k2togfb – knit two stitches together front and back.
sl1p wyif – slip one stitch purlwise with yarn in front.
(kfb x3) – knit front and back in the next three stitches.
This is a carrying pouch for your iPhone that you wear around your neck. Skills needed are Turkish cast-on, knitting in the round, and I-cord stitch. You will need to measure the width of your iPhone and calculate the number of stitches to cast on based on that measurement. The below cast-on is based on the iPhone XS
Materials:
Yarn – about 1.5 oz sport weight or 2.0 oz worsted weight yarn
(Used in example: Caron Simply Soft Paints 5 oz/141 g, 250 yds/228 m, colorway 21004 “Oceana”)
US-4 (3.5 mm) double pointed needles (or US-4 (3.5 mm) 24-inch circular needle if Magic Loop method used.)
Using Turkish cast-on to work pouch from the bottom up eliminates the need to Kitchner stitch the bottom closed.
Gauge: 18 stitches and 24 rows to 3 inches. Measure the width of your iPhone to calculate the number of stitches.
Pouch:
Using Turkish cast on, CO 20 wraps. (40 stitches)
Row 1: K
Row 2: kfb, k19, kfb, k19. (42 stitches) (42 stitches) (If your iPhone is thicker than 1/4-inch/1 mm, repeat this row.)
Row 3 and subsequent rows: k
Knit in round until work measures 1 inch longer than the length of the iPhone
Finishing pouch: K3, cast off 16, k5 and slip them off onto a stitch keeper, cast off 16. Do not break the yarn.
Cord:
Using a measuring tape, determine the length of i-cord necessary for the pouch to hang at the desired position on your chest. Be sure to take into account the width of the pouch in your measurement. Using the next 5 stitches, knit I-cord to that length.
When the i-cord is as long as you need it to be, take the remaining 5 stitches off the stitch keeper and put them on an empty needle. Put the needle with the icord stitches and the needle with the stitch keeper stitches side by side being careful not to twist any of the stitches. Transfer the 5 stitch keeper stitches and 5 i-cord stitches to another empty needle, by slipping one icord stitch, then one stitch keeper stitch, alternating back and forth until all 10 stitches have been transferred to one needle.
Bind off:
Attach the working end of the icord to the pouch in the following manner: k2tog, k2tog, ppso, k2tog, ppso, k2tog, ppso, k2toh, ppso. Break yarn and weave in ends.
These are fingerless mitts I designed for use in situations where you want the warmth but need the ability to use your fingers for, say, turning the pages of a book, or knitting, or typing. They’re stockinette on the palms to minimize bulk, but ribbed all the way up on the knuckle side for added warmth. The cuff is long enough to be turned up if desired.
Materials:
Approx. 50 g of DK or sport weigh yarn, 11-12 wpi.
Double pointed needles size 3.25mm/US3 (Or a 40-inch circular needle to do both at the same time,)
Stitch markers.
Knit in Caron Simply Soft yarn, Med: 4, 170 g / 6 oz, 288 m / 315 yds , color Medium Grey
Abbreviations:
p# = place a marker at this point.
# = position of marker
(k1, p1) x11 = repeat the instructions within the parentheses 11 times.
K1tbl = knit 1 through the back loop.
Both Mitts:
Cast on 44 stitches
Work k1, p1 ribbing for 10 cm
Thumb, both mitts:.
Put the 16 sts from the stitch holder onto your DPNs and pick up the 4 sts across the top of the thumb for a total of 20 stitches. Work (k1tbl, p1) for 7 rounds.
Bind off. Weave in all loose ends
Another shawl named for a character in C. J. Cherryh’s “Foreigner” books. If you’re familiar with the books, you’ll know who the character is. If not, spoilers! This is what I call “TV knitting” – garter stitch body and a simple two-row pattern repeat. I feel it’s easy enough for a beginning knitter to tackle. A very simple shawl pattern with a knit-as-you-go border.
Materials:
3 to 7 skeins of Caron Simply Soft Paints 5 oz/141 g, 250 yds/228 m, colorway 21004 “Oceana”
or equivalent yardage of worsted weight yarn, depending on how big you want your shawl.
US6/4.0 mm 40-inch circular needle
2 Stitch markers
Repeat rows 13 and 14 until the shawl is the size you want. If you’re going to wear it around your neck, you might want to make it smaller; if you plan to wear it as an actual shawl, you might want to make it bigger. End on a row 13 repeat.
Top Border
Row 1: p5, #, k1, *yo, k2tog, repeat from * until 5 stitches remain, yo, k1, #p5.
Row 2: k2tog, yo, k1, yo, ssk, #, yo, purl until 5 stitches remain, yo, #, k2tog, yo, k1, yo, ssk.
Row 3: p5, #, knit until 5 stitches remain, #p5.
Row 4: k2tog, yo, k1, yo, ssk, #, *yo, k2tog, repeat from * until 5 stitches remain, yo, #, k2tog, yo, k1, yo, ssk.
Row 5: purl
Row 6: knit.
Row 7: purl
Bind off knitwise.
** If you like to wear your shawls in a scarf-like fashion up around your neck, stop at 3 skeins for a smaller version. If you like to wear your shawls like a cape, use 5 or even 7 skeins.
This is a cape style shawl. When laid flat, the neck opening and the front edges of the shawl form a keyhole shape, hence the name. This shawl can be made with any worsted weight mohair or alpaca blend yarn, or combining a DK weight yarn held together with a mohair or alpaca lace weight yarn. Make it as short or long as you want it for some serious snuggle. It is recommended that it be at least 16 inches in length (measured from the inner edge of the neck band to the outer edge of the border).
Materials:
Skeins of Moda Dea Dream yarn, Medium:4, 50 g/1.76 oz, 85 m/93 yd, colors Leaf, Lilac, and Black
US8(5.0) circular needles, 24-inch, 32- inch, and 60-inch.
Cable needle
Stitch markers of two different colors (Use one color markers for the cables at each end, and the other color for the body increases.)
p# — place marker at that point.
# — slip marker from one needle to the other.
Ktm – knit to the next marker
( ) x4 – repeat the stitches within parentheses four times.
This is the horizontal equivalent of the vertical eyelet edging (Row 1: k2. Row 2: k2tog, yo.) that will give you that eyelet look across the top and bottom, as well as up both sides. Usually, the horizontal edging uses (k2tog, yo,) to “mimic” the vertical eyelet edging, but this has a noticeably thicker appearance than the eyelet twists of the vertical edging. This edging gives you that same twist of yarn, so that your border looks the same all the way around.
If you have a pattern you want to modify, you can replace the “eyelet” rows (the row of k2tog’s and yo’s, and the subsequent row of knit) with this version.
Abbreviations:
psro = pass the stitch to the right over the last stitch knitted. (Unlike the traditional “psso” where the first stitch is slipped without being worked, BOTH stitches are knitted.)
sspbl, ptbl = insert right needle as though to purl through the back loop and slip the stitch to the right needle, put the slipped stitch back on the left needle and purl through the back loop.
nbs = number of border stitches
If you are modifying a pattern, note the number of stitches to be cast on. If this number is even, cast on that many stitches -1, as row 1 of the eyelet pattern requires an odd number of stitches to work out right. Knit the number of border rows the pattern calls for. (Or if you are writing a pattern, either make sure the number of stitches to be cast on is an odd number, or add or subtract a stitch somewhere in the border rows. If you are doing garter stitch horizontal borders, the number of rows will equal the number of stitches in the vertical border + 2 rows, i.e., if the vertical border is 5 stitches wide, the horizontal borders will be 7 rows wide.)
Eyelet Rows:
Row 1: k(nbs), *k2, psro, repeat from * until (nbs + 1) remain, k2, psro, knit to end of row.
Row 2: k(nbs), *yo, sspbl, ptbl, repeat from * until (nbs) remain, yo, knit to the end of the row.
Note that you will gain a stitch on row 1 (number of stitches on the previous row +1). If you are modifying a pattern, you will need to take this extra stitch into account to make sure you don’t have too many stitches when you go back to the pattern. Most patterns that use (K2tog, yo) to mimic the vertical eyelet row usually start “yo, *K2tog, yo, repeat from . . .”, and that leading “yo” also adds a stitch, so this isn’t usually a problem.
However, if you are writing a pattern, and the body stitch you wish to use requires an even number of stitches, you will need to take this into account. You can shed that extra stitch by knitting the next row, then on the next row, change the first (k2tog, yo) to a (k3tog, yo) and start your body stitch pattern. To maintain symmetry, on the top border, do a knit row, with a kfb somewhere on that row, to set up for the eyelet rows, then do row 1, and row 2.
Materials:
Worsted weight yarn (Medium:4) 10 oz/283 g, 482 yds/440 m
US size 8 (5.0 mm) circular needle 32-inch (80 cm) or 40-inch (102 cm)
1 stitch marker.
Abbreviations:
P# = place marker
# = marker
Garter Stitch Lace Edging:
On the lace edging, the stitch count for the right sided rows varies from row to row. The stitches are counted from the marker between the body of the shawl and the edging, with the number of stitches for that lace row given in parentheses at the end.
Beginning the Shawl:
Cast on 21 stitches and knit 5 rows.
Foundation Pattern:
The foundation pattern combines the starting body pattern and the lace edging pattern written together row by row. Place a marker (#) between the body and the edging. Work Foundation Pattern one time, ending with Row 16. The numbers in parentheses are the number of edging stitches only as counted from the marker to the end of the row.
Body Increase Pattern stitch:
The Body Increase Pattern stitch is worked 4 times per repeat of the Garter Stitch Lace Pattern.
Row 1(RSR): knit until 1 st before marker, kfb.
Row 2: *p1, k1, repeat from * until 3 stitches remain, k3.
Row 3: knit until 1 st before marker, kfb.
Row 4: *p1, k1, repeat from * until 4 stitches remain, p1, k3.
Work a total of 10 repeats of the Garter Stitch Lace pattern for this section. Your total stitch count will increase 8 stitches for each repeat of the Garter Stitch Lace Pattern. (Total stitches after each repeat: 37, 45, 53, 61, 69, 77, 85, 93, 101, 109.)
Body Center Pattern:
The Body Center Pattern is worked 4 times per repeat of the Garter Stitch Lace Pattern.
Row 1: knit until 1 st before marker, kfb.
Row 2: *p1, k1, repeat from * until 3 stitches remain, k3.
Row 3: knit until 1 st before marker, ssk.
Row 4: *p1, k1, repeat from * until 4 sts remain, p1, k3.
Work 1 repeat of the Garter Stitch Lace Pattern for this section. Total stitch count at the end of this section: 109
Body Decrease Pattern:
The Body Decrease Pattern stitch is worked 4 times per repeat of the Garter Stitch Lace Pattern.
Row 1:(RSR) knit until 2 sts before marker, ssk.
Row 2: *p1, k1, repeat from * until 3 sts remain, k3.
Row 3: knit until 2 sts before marker, ssk.
Row 4: *p1, k1, repeat from * until 4 sts remain, p1, k3.
Work a total of 10 repeats of the Garter Stitch Lace pattern for this section. Your total stitch count will decrease 8 stitches for each repeat of the Garter Stitch Lace Pattern. (Total stitches after each repeat: 101, 93, 85, 77, 69, 61, 53, 45, 37, 29.)
Ending Pattern:
The ending pattern combines the body pattern and the lace edging pattern together written row by row. Work 1 repeat.
This makes a large adult hat 24 inches in diameter.
Gauge: 4 stitches per inch.
Materials:
1 skein knitting worsted, color of choice
1 size US 6 (4.0 mm) circular 16-inch knitting needles.
1 set of size US 6 (4.0 mm) double pointed needles.
1 row marker
6 stitch markers that are distinctive in size or color from row marker.
Length of scrap yarn for provisional cast on.
Cast on 96 stitches using provisional cast on.
Row 1-3: Knit
Work k1, p1 ribbing until work measures 3 inches.
Knit 3 rows
Pattern stitch:
Row 1: *P3, k9, place marker, repeat from * to end of row.
Row 2: *P3, k9, repeat from * to end of row
Repeat row 2 until hat measures 6-1/4 inches. Repeat row 2 once more, removing your markers as you work the row. Hem the brim.
“Hemming” the Brim:
Fold the edge with the provisional cast-on under just as though you were turning a hem and bring it up through the center of the work (fold with the ribbing inside, knit side outside). Starting at the beginning of the provisional row, put the stitches from the provisional cast-on onto a second needle – either all of them onto a circular needle, or as many as will comfortably fit onto one double pointed needle, transferring more provisional stitches onto the DPN as necessary. Use your right-hand needle to transfer the first provisional stitch on that row from the provisional needle to the left-hand working needle and purl it and the first stitch on the working row together (p2tog). Transfer the second provisional stitch onto the left-hand needle and purl it and the second working stitch on the row together. Continue on around, working in pattern, until the end of the row. Make sure the beginning yarn end gets tucked down into the fold and is hidden inside the “hemmed” portion. You should come out even, with the last provisional stitch and the last working stitch being knitted together. You should end up with 96 stitches.
Begin working pattern stitch again starting with row 1. Repeat row 2 until work measures 8-1/3 inches. Work decreases.
Decreases
Row 1: *P3, k4, k2tog, k3 repeat from * to end of row.
Row 2: *P3, k3, k2tog, k3, repeat from * to end of row.
Row 3: *P3, k2, k2tog, k3, repeat from * to end of row.
Row 4: *P3, k2, k2tog, k2, repeat from * to end of row.
Row 5: *P3, k1, k2tog, k2, repeat from * to end of row.
Row 6: *P1, p2tog, k4, repeat from * to end of row.
Row 7: *P2, k1, k2tog, k1, repeat from * to end of row.
Row 8: *p2tog, k1, k2tog, repeat from * to end of row.
Row 9: *k2tog, repeat from * to end of row
Cut thread, pass thread through stitches on needle, pull tight and secure.